티스토리 뷰
Search Bar 만들기
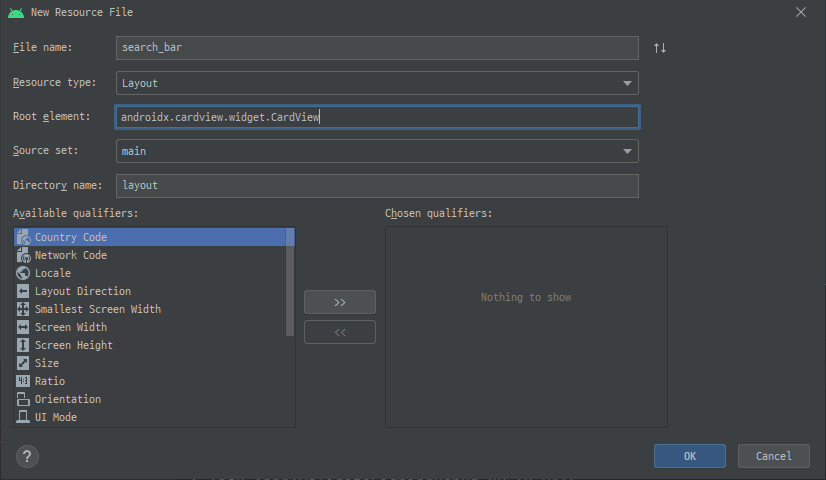
검색을 하기 위해서 먼저 Search Bar를 아래와 같이 만들어줍니다.

<?xml version="1.0" encoding="utf-8"?>
<androidx.cardview.widget.CardView xmlns:android="http://schemas.android.com/apk/res/android"
    android:layout_width="match_parent"
    android:layout_height="match_parent"
    xmlns:app="http://schemas.android.com/apk/res-auto"
    app:cardCornerRadius="4dp">

    <androidx.constraintlayout.widget.ConstraintLayout
        android:layout_width="match_parent"
        android:layout_height="match_parent"
        android:minHeight="40dp"
        android:minWidth="40dp">

        <ImageView
            android:id="@+id/searchButton"
            android:layout_width="wrap_content"
            android:layout_height="0dp"
            android:src="@drawable/ic_search_black_24dp"
            app:layout_constraintEnd_toEndOf="parent"
            app:layout_constraintTop_toTopOf="@+id/autoCompleteTextView"
            app:layout_constraintBottom_toBottomOf="@+id/autoCompleteTextView"
            android:layout_marginEnd="8dp"/>

        <AutoCompleteTextView
            android:id="@+id/autoCompleteTextView"
            android:layout_width="0dp"
            android:layout_height="0dp"
            app:layout_constraintStart_toStartOf="parent"
            app:layout_constraintEnd_toStartOf="@+id/searchButton"
            app:layout_constraintTop_toTopOf="parent"
            app:layout_constraintBottom_toBottomOf="parent"
            app:layout_constraintHeight_max="100dp"
            android:hint="여기에서 검색하세요."
            android:background="@android:color/transparent"
            android:layout_margin="8dp"/>


    </androidx.constraintlayout.widget.ConstraintLayout>


</androidx.cardview.widget.CardView>
위와 같이 xml을 작성합니다.
그리고 main xml에서 아래의 코드를 추가해줍니다.
 <include
    android:id="@+id/search_bar"
    android:layout_width="match_parent"
    android:layout_height="wrap_content"
    android:layout_margin="8dp"
    app:layout_constraintTop_toTopOf="parent"
    app:layout_constraintStart_toStartOf="parent"
    app:layout_constraintEnd_toEndOf="parent"
    layout="@layout/search_bar"/>
Search Bar 기능 구현하기
검색 기능을 구현하기 위해서 먼저 서버에서 읽어 온 JSON 데이터와 ClusterManager 클래스에 추가한 MyItem 클래스를 연결하는 변수가 필요합니다. 따라서 MainActivity에 아래 코드를 추가해줍니다.
onLowMemory 함수 하단
val itemMap = mutableMapOf<JSONObject, MyItem>()
ToiletReadTask의 onPreExecute
itemMap.clear()
itemMap 변수 초기화 코드.
ToiletReadTask의 onPostExecute
override fun onPostExecute(result: String?) {

        val textList = mutableListOf<String>()

        for(i in 0 until toilets.length()) {
            val toilet = toilets.getJSONObject(i)
            textList.add(toilet.getString("FNAME"))
        }

        val adapter = ArrayAdapter<String> (
            this@MainActivity,
            android.R.layout.simple_dropdown_item_1line,
            textList
        )

        search_bar.autoCompleteTextView.threshold = 1
        search_bar.autoCompleteTextView.setAdapter(adapter)
}search_bar.autoCompleteTextView.threshold = 1
search_bar.autoCompleteTextView.setAdapter(adapter)
는 백그라운드 작업이 완료된 후에 실행이 됩니다.
위의 코드를 설명하면
val textList = mutableListOf<String>()자동완성 텍스트뷰에서 사용할 텍스트 리스트를 선언합니다
for(i in 0 until toilets.length()) {
    val toilet = toilets.getJSONObject(i)
    textList.add(toilet.getString("FNAME"))
}
텍스트 리스트에 모든 화장실의 이름을 추가합니다.
val adapter = ArrayAdapter<String> (
    this@MainActivity,
    android.R.layout.simple_dropdown_item_1line,
    textList
)
자동완성 텍스트뷰에서 사용할 어댑터를 추가합니다
search_bar.autoCompleteTextView.threshold = 1
search_bar.autoCompleteTextView.setAdapter(adapter)
자동완성이 시작되는 글자 수를 지정하고, 어댑터를 지정해줍니다.
onPostExecute는 정보 데이터를 기반으로 화장실 이름만 뽑아서 리스트를 만들고 있습니다. 그리고 AutoCompleteTextView의 자동 완성 기능에 해당 리스트를 사용합니다.
addMarkers 함수
val item = MyItem(
    LatLng(toilet.getDouble("Y_WGS84"), toilet.getDouble("X_WGS84")),
    toilet.getString("FNAME"),
    toilet.getString("ANAME"),
    BitmapDescriptorFactory.fromBitmap(bitmap)
)

itemMap[toilet] = item
itemMap 변수에 JSONObject와 MyItem 객체를 연결해줍니다.
itemMap에 저장하는 이유는 이후 검색에서 사용하기 위해서입니다.
onStart 함수 위에 JSONArray를 위한 확장 함수 추가
fun JSONArray.findByChildProperty(propertyName: String, value: String): JSONObject? {

    for(i in 0 until length()) {
        val obj = getJSONObject(i)
        if(value == obj.getString(propertyName)) return obj
    }

    return null
}
JSONArray를 순환하면서 각 JSONObject의 프로퍼티의 값이 같은지 확인합니다.
onStart 함수에서 SearchBar 구현
search_bar.searchButton.setOnClickListener {

        val keyword = search_bar.autoCompleteTextView.text.toString()

        if(TextUtils.isEmpty(keyword)) return@setOnClickListener


        toilets.findByChildProperty("FNAME", keyword)?.let {

            val myItem = itemMap[it]

            val marker = clusterRenderer?.getMarker(myItem)

            marker?.showInfoWindow()

            googleMap?.moveCamera(
                CameraUpdateFactory.newLatLngZoom(
                    LatLng(it.getDouble("Y_WGS84"), it.getDouble("X_WGS84")), DEFAULT_ZOOM_LEVEL)
            )
            clusterManager?.cluster()
        }

        search_bar.autoCompleteTextView.setText("")
    }
코드에 대해 설명을 하면 아래와 같습니다.
val keyword = search_bar.autoCompleteTextView.text.toString()

if(TextUtils.isEmpty(keyword)) return@setOnClickListener
autoCompleteTextView의 텍스트를 읽어 키워드로 가져오고 키워드가 없으면 그대로 반환합니다.
toilets.findByChildProperty("FNAME", keyword)?.let {

    val myItem = itemMap[it]

    val marker = clusterRenderer?.getMarker(myItem)

    marker?.showInfoWindow()
}
만든 findByChildProperty로 itemMap에서 JSONObject를 가진 MyItem 객체를 가져옵니다.
그리고 ClusterRenderer에서 myItem을 기반으로 마커를 검색하고 인포 윈도우를 보여줍니다.
googleMap?.moveCamera(
    CameraUpdateFactory.newLatLngZoom(
    LatLng(it.getDouble("Y_WGS84"), it.getDouble("X_WGS84")), DEFAULT_ZOOM_LEVEL)
    )
clusterManager?.cluster()
마커 위치로 카메라를 이동합니다.
search_bar.autoCompleteTextView.setText("")검색 텍스트뷰의 텍스트를 지웁니다.
앱을 실행하면 검색을 할 수 있고 검색된 위치로 이동, 인포 윈도우까지 보여주는 것을 확인할 수 있습니다.
예제 코드
https://github.com/Im-Tae/Blog_Example/tree/master/Android/Google_Map_Example
'알려주는 이야기 > 안드로이드' 카테고리의 다른 글
| 안드로이드 커스텀 리스트 뷰 (0) | 2020.06.30 |
|---|---|
| 안드로이드 리스트 뷰 (0) | 2020.06.30 |
| 안드로이드 구글 지도 사용하기 - 3 [클러스터링 사용하기] (0) | 2020.06.06 |
| 안드로이드 구글 지도 사용하기 - 2 [공공 API 연동하기] (2) | 2020.06.06 |
| 안드로이드 구글 지도 사용하기 - 1 [구글 지도 띄우기] (0) | 2020.06.06 |
