
티스토리 뷰
반응형
Text
Text는 아래와 같은 생성자로 이루어져 있습니다.
const Text(
    this.data, {
    Key key,
    this.style,
    this.strutStyle,
    this.textAlign,
    this.textDirection,
    this.locale,
    this.softWrap,
    this.overflow,
    this.textScaleFactor,
    this.maxLines,
    this.semanticsLabel,
    this.textWidthBasis,
  })
아래는 전체 예제 코드입니다.
import 'package:flutter/material.dart';

void main() => runApp(TextDemo());

class TextDemo extends StatelessWidget {

  static const String _title = "제목";
  static const String _name = "이름";
  static const String _longText = """
  Lorem text Lorem text Lorem text Lorem text Lorem text Lorem text Lorem text Lorem text
  Lorem text Lorem text Lorem text Lorem text Lorem text Lorem text Lorem text Lorem text
  """;


  @override
  Widget build(BuildContext context) {
    return MaterialApp(
      title: _title,
      home: Scaffold(
        appBar: AppBar(title: Text(_title)),
        body: Column(
          crossAxisAlignment: CrossAxisAlignment.start,
          children: <Widget>[
            Text('텍스트'),
            Text(
              'Styled Text $_name',
              style: TextStyle(
                color: Colors.black,
                fontSize: 20.0,
                background: Paint()
                  ..color = Color(0xFFFF2400)
                  ..style = PaintingStyle.fill,
                fontWeight: FontWeight.bold
              ),
            ),
            Text(
              _longText,
              overflow: TextOverflow.ellipsis,
            )
          ],
        ),
      ),
    );
  }
}
위에 보면 TextStyle을 적용한 코드가 있는 것을 확인할 수 있습니다.
마지막에 Text 부분에서는 overflow 속성을 지정했습니다. 이것은 텍스트가 정해진 공간을 넘었을 때 ...을 표시합니다.

TextStyle에서는 아래와 같은 요소를 지정할 수 있습니다.
const TextStyle({
    this.inherit = true,
    this.color,
    this.backgroundColor,
    this.fontSize,
    this.fontWeight,
    this.fontStyle,
    this.letterSpacing,
    this.wordSpacing,
    this.textBaseline,
    this.height,
    this.locale,
    this.foreground,
    this.background,
    this.shadows,
    this.fontFeatures,
    this.decoration,
    this.decorationColor,
    this.decorationStyle,
    this.decorationThickness,
    this.debugLabel,
    String fontFamily,
    List<String> fontFamilyFallback,
    String package,
  })
Image
작은 화면에 다양한 형태의 이미지나 아이콘을 표시할 수 있습니다.
단순히 이미지를 불러오고 싶으면 Image.asset 함수를 호출하면 됩니다.
먼저 이미지를 내부 asset 폴더에 저장을 하겠습니다.
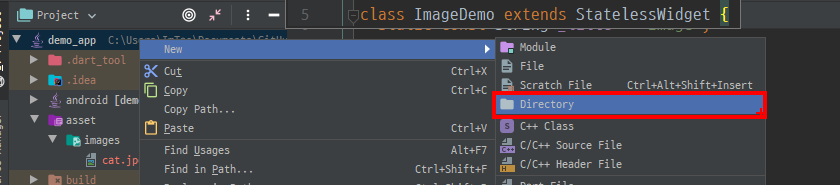
New > Directory를 눌러서 asset 폴더를 하나 생성해줍니다.
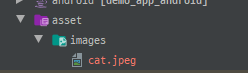
그리고 하위 폴더로 images 폴더를 생성해주고 안에 사진을 넣었습니다.

pubspec.yaml 파일을 열어주고
flutter:
    assets:
        - asset/images/cat.jpeg
이런 식으로 사진을 연결해 줍니다.
import 'package:flutter/material.dart';

void main() => runApp(ImageDemo());

class ImageDemo extends StatelessWidget {
  static const String _title = "Image";

  @override
  Widget build(BuildContext context) {
    return MaterialApp(
      title: _title,
      debugShowCheckedModeBanner: false,
      home: Scaffold(
        appBar: AppBar(title: Text(_title)),
        body: Column(
          crossAxisAlignment: CrossAxisAlignment.center,
          children: <Widget>[
            Image.asset('asset/images/cat.jpeg')
          ],
        ),
      ),
    );
  }
}
그리고 코드를 입력을 하고 빌드를 하면

사진이 나오는 것을 확인할 수 있습니다.
아래는 Image.asset 함수의 생성자입니다.
Image.asset(
    String name, {
    Key key,
    AssetBundle bundle,
    this.frameBuilder,
    this.semanticLabel,
    this.excludeFromSemantics = false,
    double scale,
    this.width,
    this.height,
    this.color,
    this.colorBlendMode,
    this.fit,
    this.alignment = Alignment.center,
    this.repeat = ImageRepeat.noRepeat,
    this.centerSlice,
    this.matchTextDirection = false,
    this.gaplessPlayback = false,
    String package,
    this.filterQuality = FilterQuality.low,
    int cacheWidth,
    int cacheHeight,
  })
반응형
'알려주는 이야기 > Flutter' 카테고리의 다른 글
| Flutter - Container, Row, Column (0) | 2020.07.31 |
|---|---|
| Flutter - RaisedButton 위젯 (0) | 2020.07.21 |
| Flutter - 위젯 개념과 생명주기 (0) | 2020.07.17 |
| Flutter - 앱 구조 확인하기 (0) | 2020.07.17 |
| Flutter - 다트 언어 문법 간단히 알아보기 (0) | 2020.07.07 |
댓글